Optimize Payroll with Paymanager: Ultimate Solution

paymanager

Paymanager: Making Payroll Management a Breeze

The Challenge of Payroll Management

Payroll management can be a daunting task for many businesses, especially those with a large number of employees. From calculating wages and deductions to ensuring compliance with tax regulations, the process is complex and time-consuming. As an HR personnel, you need to be both meticulous and efficient in managing payroll while juggling your other responsibilities.

Fortunately, there’s a solution that makes payroll management simpler and more efficient: Paymanager. This cloud-based payroll management system streamlines the entire payroll process from start to finish.

What is Paymanager?

Paymanager is an online software designed to help businesses manage their payroll processing effectively. The platform eliminates tedious manual processes that come with traditional payroll systems while providing accuracy, speed, and convenience to HR personnel. It is equipped with features that automate the different stages of the payroll process, ranging from calculating employee salaries and taxes to generating payslips.

With this technology at your fingertips, you can quickly calculate payments accurately without worrying about human errors or miscalculations. You can also generate real-time reports on employee payments for better decision-making.

The Benefits of Paymanager

Switching to Paymanager offers several benefits for your organization: Increased Accuracy: With automated calculations and integrated tax compliance checks in place, you’ll enjoy increased accuracy while minimizing errors during the payment cycle.

Time-Saving: You’ll save time spent on manually handling tasks such as data entry or paper-based systems by automating them through pay manager processes. Employee Self-Service Portal: Your employees will appreciate having access to their payslips electronically through Payer Manager’s secure self-service portal at any time.

Paymanager provides an efficient solution for managing your company’s complex payroll cycle. It’s a quick, accurate, and secure way to process payments for your employees while saving you time and frustration along the way.

Features of Paymanager

Automated payroll processing

One of the most important features of Paymanager is its ability to automate payroll processing. This feature enables you to save time and money by eliminating the need for manual calculations and reducing the risk of errors. With Paymanager, you can easily set up a payroll schedule, enter employee data, and have the system automatically calculate salaries, deductions, and taxes.

Moreover, this feature makes it easy for companies to comply with government regulations since tax calculations are done automatically. The system also generates reports that are useful in analyzing trends in employee salaries and benefits.

Employee self-service portal

Another great feature of Paymanager is its employee self-service portal. This allows employees to have access to their personal information such as their salary details, leave balances, pay slips and other related information anytime they want. They can also use this portal for updating their personal information such as address or contact details without needing HR administration support.

This feature comes with a lot of benefits for employers too. It eliminates the need for HR administrators to constantly answer employee queries or provide basic HR-related services which saves time and resources.

Tax compliance and reporting

Paymanager ensures tax compliance by keeping track of all necessary documentation such as W-4 forms that employees complete when they start work at your company.Pay manager calculates taxes based on current rules ensuring that all employees’ tax contributions are accurate. In addition to this,PAY manager generates comprehensive reports required by federal governments e.g., W-2s at year-end which makes complying with government regulations easy since these reports contain all required data in an organized manner.They not only help in complying with regulations but also serve as valuable sources of information when making business decisions about payroll management..

Time and attendance tracking

Paymanager offers an integrated time-tracking system that makes it easy to manage employee schedules, attendance, and leaves. It allows employees to clock in and out of work using the self-service portal or a mobile app that can be used on their phones. With this feature, HR administrators and managers can easily view real-time reports about employee attendance and leave balances.

This helps organizations track employee productivity efficiently. By keeping an eye on attendance trends and patterns, employers can identify areas where improvements need to be made or where additional resources might be required.

Paymanager has several features that make payroll management a breeze for businesses of all sizes. With automated payroll processing features, an intuitive self-service portal for employees, tax compliance features as well as time and attendance tracking capabilities, Paymanager makes sure that everyone in your organization is taken care of when it comes to payroll management.

Benefits of using Paymanager

Increased accuracy and efficiency in payroll processing

One of the most significant benefits of using Paymanager as your payroll management system is the increased accuracy and efficiency it provides. With automated processes, Paymanager virtually eliminates human error from your payroll processing.

This means that your employees’ paychecks are always accurate, and you don’t have to worry about correcting mistakes later. Additionally, the system can automatically calculate deductions such as taxes, insurance premiums, and retirement contributions.

Time-saving for HR personnel

Another advantage of using Paymanager is the time-saving benefits it offers HR personnel. By automating many aspects of payroll processing, such as data entry and calculations, HR personnel have more time to focus on other essential tasks. Additionally, with the employee self-service portal provided by Paymanager, employees can manage their own information and access their pay stubs without requiring assistance from HR personnel.

Improved employee satisfaction with self-service portal

The employee self-service portal provided by Paymanager has several benefits for both employees and employers. Employees can use the portal to view their pay stubs, track vacation time usage, make changes to their W-4 forms or direct deposit accounts on their own schedule without having to contact HR or a manager directly. This reduces frustration among employees who wish they could easily access this type of information but may not be able to do so due to scheduling conflicts or other reasons.

Reduced risk of non-compliance with tax regulations

Using a system like Paymanager can reduce your risk of non-compliance with tax regulations. The software keeps up-to-date with any changes in tax laws or regulations so that you don’t have to worry about constantly monitoring them yourself.

In addition, because all calculations are made by the software based on current rules and regulations, it becomes almost impossible to make an error with regards to taxes and other deductions. Overall, this feature of Paymanager can help you avoid costly mistakes and penalties related to tax compliance.

How to Set Up Paymanager

Setting up Paymanager is a breeze, and the intuitive interface makes it easy for even beginners to navigate. In this section, we will go over the steps involved in setting up your account and getting started with payroll processing.

Creating an Account

The first step in setting up Paymanager is to create an account. Head over to their website and click on the “Sign Up” button. You will be asked to provide some basic information such as your email address, company name, and contact details.

Once you have entered your details, you will be prompted to select a plan that best suits your business needs. Paymanager offers various pricing plans based on the number of employees in your company.

Adding Employee Information

After creating your account, the next step is to add employee information into the system. You can either manually enter employee data or upload it via an excel file.

The fields include name, address, phone number, social security number (SSN), date of birth (DOB), salary or hourly wages and bonuses. It’s crucial that you provide accurate information as this will be used during payroll processing which helps avoid mistakes.

Setting Up Payroll Schedules

With employee data uploaded successfully into Paymanager, it’s time to set up payroll schedules for each employee group. You can schedule pay periods weekly or monthly depending on what works best for your business operations. In addition to scheduling pay periods you have the option of scheduling payments directly into employees’ bank accounts through direct deposit system which eliminates paper checks or cash handling.

What is paymanager id ?

Paymanager ID refers to an identification number assigned to an individual or organization within the Paymanager system. Paymanager is an online platform used for processing salary-related activities in Rajasthan state in India. Paymanager ID serves as an identifier that helps streamline salary payments, employee records and financial transactions.

Paymanager ID allows users to securely access and efficiently administer salary disbursements, making the process more streamlined for both employees and organizations alike. It enables efficient administration of salary disbursements while remaining transparent for both.

How to download payslip from paymanager

To download your payslip from PayManager, you can follow these general steps:

  1. Log in to your PayManager account using your username and password.
  2. Once logged in, navigate to the “Payslip” or “Salary Slip” section. The exact location may vary depending on the specific layout and configuration of your PayManager system.
  3. In the payslip section, select the desired time period or month for which you want to download the payslip. This may be presented in the form of a drop-down menu or a calendar.
  4. After selecting the appropriate time period, click on the “Download” or “Generate Payslip” button. This action will initiate the creation and download of your payslip.
  5. The payslip file is typically downloaded in PDF or Excel format. Save the file to your preferred location on your device.

It’s important to note that the exact steps may differ slightly based on the specific PayManager version or customization implemented by your organization. If you encounter any difficulties or variations, it’s advisable to consult the user manual, guidelines provided by your organization, or contact your system administrator or support team for specific instructions.

How to open paymanager ?

To open PayManager, follow these general steps:

  1. Make sure that you have a compatible device and stable internet access before starting this course.
  2. Launch a web browser such as Chrome, Firefox or Safari on your device.
  3. Enter the official PayManager website address or URL into the address bar of your web browser, usually provided by your organization or employer. It could look something like “www.paymanager.com” or “paymanager.yourcompanyname.com.”
  4. Press “Enter” or select the Go button to access PayManager website.
  5. On the PayManager website’s landing page, you will typically find a login section. Enter your username and password into their respective fields; these credentials should have been provided by either your HR department or PayManager administrator.
  6. After entering your username and password, click on “Login” or “Sign In”.
  7. If the provided credentials are valid, you will be successfully logged into PayManager and can take advantage of various features including salary information, employee records management, leave management and other related functions.

Please be aware that the steps and appearance of PayManager login may differ depending on the version or customization of software used by your organization. If you experience difficulty accessing PayManager, contact your IT department or designated support channels immediately for assistance.

How to reset paymanager password

To reset your PayManager password, you can typically follow these general steps:

  1. Visit the PayManager login page through your web browser.
  2. Look for an option like “Forgot Password” or “Reset Password” on the login page. It is usually located near the login fields.
  3. Click on the “Forgot Password” or similar option to initiate the password reset process.
  4. You may be asked to provide some identifying information, such as your username, registered email address, or employee ID. Enter the required information accurately.
  5. After providing the necessary details, submit the information by clicking on the “Submit” or “Reset Password” button.
  6. PayManager will send an email to the registered email address associated with your account. This email will contain instructions on how to reset your password.
  7. Open the email and follow the instructions provided. It might include a link to a password reset page or a temporary password that you need to change upon login.
  8. Create a new password for your PayManager account. Ensure that you choose a strong and secure password that is unique and not easily guessable. Follow any guidelines or requirements specified by PayManager.
  9. Save your new password securely and remember it for future logins.

If you do not receive the password reset email or encounter any issues during the process, it is recommended to reach out to your organization’s IT department or the designated support channels for further assistance. They will be able to provide you with specific instructions or help you reset your password successfully.

How to create paymanager employee id

Creating a PayManager employee ID is typically done by the administrator or HR department of your organization. As an employee, you usually do not have direct control over creating your employee ID in PayManager. However, you can follow these general steps to request or obtain your employee ID:

  1. Contact your organization’s HR department or the designated PayManager administrator. They will provide you with the necessary information and guidance on how to create your employee ID.
  2. Provide the HR department or administrator with any required information, such as your personal details, employment information, and any other relevant information they may need to generate your employee ID.
  3. The HR department or administrator will create your employee ID in the PayManager system based on the information you provided. They may also assign you a username and initial password for your PayManager account.
  4. Once your employee ID is created, the HR department or administrator will typically inform you of your ID and provide you with login credentials and instructions on how to access PayManager.
  5. Use the provided username and password to log in to PayManager. Upon logging in for the first time, you may be prompted to change your password to something more secure.

Remember, the exact process may vary depending on your organization’s policies and the specific PayManager system they use. It is advisable to reach out to your HR department or PayManager administrator for detailed instructions specific to your organization.

Is there a good online bill pay manager?

Yes, there are numerous online bill pay managers available that can assist with managing and paying your bills more easily. Here are a few popular examples:

  1. Mint Bills : (formerly Check) is an award-winning bill pay manager that makes managing, tracking and paying your bills online easy and manageable with features such as bill reminders, tracking capabilities and payment scheduling capabilities.
  2. Prism: Prism is an online bill pay manager that makes managing and paying your bills simple and manageable, providing reminders, account linkage and payments direct from its app.
  3. Bill.com: Bill.com offers businesses a comprehensive bill pay and invoicing platform to manage bills, approvals, payments, and approvals efficiently and effortlessly. With features designed specifically to assist businesses manage bills more easily while streamlining payment processing – Bill.com can be an ideal partner in meeting these business requirements.
  4. Quicken Bill Pay: Quicken’s Bill Pay service allows users to manage and pay their bills right from within the application, saving time and effort when paying bills on time.
  5. Zoho Invoice: Zoho Invoice is an invoicing software with bill management and payment capabilities that enables you to easily create and send invoices, collect payments, manage bills and keep an overview of them all from one convenient platform.

These are only some examples of online bill pay managers available, and it is essential that you evaluate features, pricing and compatibility with your financial accounts in order to find one best suited to you. Be sure to research terms of service agreements, security measures and customer reviews prior to selecting your chosen service.

What is PayManager APK?

PayManager APK refers to the installation file for Android devices running the PayManager application. APK stands for Android Package Kit and is the file format commonly used to distribute and install apps on these operating systems.
Find your PayManager APK file using these steps:

  1. Find reliable sources associated with PayManager by going directly to its official website or authorized distribution channels. This could mean visiting either its own domain name, or another source authorised to distribute the PayManager app.
  2. Search the website for an “Download” or “Get the App” section.
  3. Make sure that you download an APK file from a legitimate and trustworthy source to minimize security risks. When in doubt, opt for official sources or app stores such as the Google Play Store or trusted third-party app stores when seeking APK files.
  4. Clicking on the download link or button will initiate the download of PayManager APK file.
  5. Once downloaded, locate it in either your device’s storage or Downloads folder.
  6. Before installing an APK file on your device, ensure it allows installation from unknown sources. To do this, access your settings > Security or Privacy and toggle “Unknown Sources” off.
  7. Tap on the PayManager APK file downloaded to initiate its installation process.
  8. Follow the on-screen instructions to complete PayManager installation on your Android device.

Be wary when downloading and installing APK files from external sources. Verifying their legitimacy and safety are vital steps in protecting both your device and personal data.

To obtain an APK file of PayManager, it’s advisable to visit its official website or ask your organization’s IT department or administrator for instructions specific to its PayManager installation.

Tips for Optimizing the Use of Paymanager

Regularly Updating Employee Information

One of the most important tips for optimizing the use of Paymanager is to regularly update employee information. This includes personal details such as name, address, and contact information, as well as their job title, pay rate, and tax status.

Not only does this ensure accuracy in payroll processing, but it also makes it easier to keep track of employee data. Updating employee information can be done easily through the Employee Self-Service portal on Paymanager.

It is important to encourage employees to also keep their own information up-to-date through this portal. This not only saves time for HR personnel but also empowers employees to take control of their own data.

Utilizing the Reporting Features for Analysis and Decision-Making

Another way to optimize the use of Paymanager is by utilizing its powerful reporting features. These reports provide valuable insights into payroll data, including total labor costs by department or job category and overtime hours worked per employee. By analyzing these reports regularly, businesses can make informed decisions about staffing levels and budget allocation.

For example, if a certain department consistently has high labor costs or overtime hours worked, it may be time to re-evaluate workload distribution or consider hiring additional staff members. In addition to being a useful tool for decision-making, these reports can also help businesses stay compliant with tax regulations by providing accurate data for tax filings.

Closing Thoughts

Optimizing the use of Paymanager involves more than just setting up an account and creating payroll schedules. By regularly updating employee information and utilizing reporting features for analysis and decision-making purposes, businesses can streamline payroll processing while still maintaining accuracy and compliance with regulations. Investing time in learning how to use these tools effectively will ultimately save time in the long run while providing valuable insights into your business operations.

Frequently Asked Questions about Paymanager

How secure is the system?

Paymanager takes security very seriously and has implemented several measures to ensure the safety of user data. The system uses encrypted connections to protect sensitive information during transmission and stores data in a secure, dedicated server hosted in a well-known data center. Additionally, employees are required to use strong passwords and employers have the ability to set up multi-factor authentication for added security.

Paymanager also conducts regular security audits and updates their software with the latest patches to protect against potential vulnerabilities. Overall, Paymanager has implemented robust security measures to keep your payroll data safe.

What happens if there are errors in the payroll processing?

Mistakes can happen during payroll processing, but Paymanager provides tools to help you identify and correct errors quickly. If an error is found, you can easily make adjustments within the system and re-run payroll for affected employees. If an error results in overpaying or underpaying an employee, it’s important to correct it as soon as possible.

Overpayments will need to be recouped from future paychecks or through other arrangements with the employee. Underpayments will need to be paid out promptly according to state law.

In some cases where a mistake is not caught until after payday, you may need to issue a correction on a subsequent paycheck or make a manual adjustment outside of Paymanager. However, by using Paymanager’s reporting features regularly throughout your payroll process – including before finalizing each pay period – you can minimize these types of errors altogether.

Conclusion

Paymanager is a fantastic tool for businesses of all sizes to manage their payroll more efficiently. With automated processing, employee self-service portals, and tax compliance and reporting features, Paymanager can save HR personnel significant amounts of time and reduce the risk of non-compliance with tax regulations.

One major benefit of using Paymanager is increased accuracy in payroll processing. The system’s automated processes reduce the risk of human error when calculating wages and taxes.

Additionally, the employee self-service portal allows employees to view their pay stubs, benefits information, and update their personal information themselves, reducing the workload on HR personnel. Another advantage of Paymanager is that it is easy to set up and use.

Setting up an account only takes a few steps, and adding employee information is intuitive with clear prompts provided by the system during setup. Once everything is set up correctly, HR can easily process payroll on schedule without any hiccups or complications.

Overall, if you are looking for an efficient way to manage your business’s payroll without spending too much time on it or risking noncompliance issues with tax regulations, Paymanager might be just what you need. Give it a try today!

Homepage: sarkarijindagi.com

Write Guest Post and Earn: A Step-by-Step Guide

Are you searching for ways to earn cash online? Guest post and earn is an efficient method that can earn you money by providing quality information to websites. In this blog we’ll explore the advantages of guest blogging, offer an easy-to-follow guideline on how to begin and provide answers to the many of the questions that people have about the subject.

Why Guest Blogging is a Great Way to Earn Money

It’s a winning for both website and blogger owners. As blogger, you are able to grow your audience, establish your reputation and establish your expert in your area of expertise. By submitting high-quality content to various websites, it will also earn backlinks that will improve your site’s rank in the search engines and lead more visitors to your website.

However websites owners gain current and relevant content that keeps their visitors active and informed. In accepting guest blogs owners of websites can diversify their content and provide new perspectives to their readers. The result is an energizing partnership that lets bloggers make money while assisting site owners offer quality content to their visitors.

Step 1: Find Websites That Accept Guest Posts

The first step of the process of guest-blogging is to locate websites that allow guest blog posts. Start through Google to look up websites with the “write for us” or “contribute” page. They usually have guidelines for submitting guest posts, which include the subjects they’re interested in, the word count requirements, as well as formatting guidelines. Be sure to study and follow these guidelines to maximize the likelihood of having your guest blog accepted.

You can also utilize online tools such as Moz, Ahrefs, or SEMrush to determine which websites allow guest post submissions. These tools can assist you to locate websites with an excellent domain authority and traffic that could bring greater exposure to your guest blog post.

What are some popular websites that accept guest posts?

So, you’re looking for some hot websites where you can drop a guest post? No worries, I’ve got you covered! Here are some popular websites that are all about accepting guest posts:

  1. Forbes (www.forbes.com) – Yep, you heard it right! Forbes, the big shot online publication, is all ears for high-quality guest posts from industry experts and thought leaders like you. Show ’em what you got!
  2. Huffington Post (www.huffpost.com) – The famous HuffPost, where news and opinions collide, is open to guest posts on a wide range of topics. If you’ve got a unique perspective to share, they’re all ears for it!
  3. Inc. (www.inc.com) – If you’re all about entrepreneurship, small biz, and startups, then Inc. is the place for you! They’re always on the lookout for valuable insights and advice from business-savvy contributors like you.
  4. Entrepreneur (www.entrepreneur.com) – Calling all aspiring and established entrepreneurs! Entrepreneur.com is a prime spot to drop your guest post on business, leadership, marketing, and more. Share your wisdom with the entrepreneur community!
  5. Medium (www.medium.com) – Looking for a platform to spill your thoughts and ideas? Medium is where you can showcase your writing prowess on various subjects. Get ready to make some noise with your original content!
  6. HubSpot (www.hubspot.com) – If you’re a marketing whiz, sales pro, or customer service guru, then HubSpot is your jam! They’re always hungry for guest posts from industry experts and practitioners like you. Feed ’em with your knowledge!
  7. Smashing Magazine (www.smashingmagazine.com) – Web designers and developers, listen up! Smashing Magazine is the place to strut your stuff with guest posts that provide practical tips and insights. Show ’em your smashing skills!

Remember to check each website’s submission guidelines carefully and keep it original – no copy-pasting! Let your unique voice shine through and rock those guest posts, folks! Kapil out! 😎🚀

How can I find websites with high domain authority for guest blogging?

Wanna know how to find those high and mighty websites for guest blogging? Don’t worry, I got your back! Here are some cool ways to track down websites with killer domain authority:

  1. Play the keyword game: Use keyword research tools to sniff out relevant topics and keywords in your niche. Look for websites that rock the search results for these keywords – they’re likely to have some serious domain authority going on!
  2. Hunt in blog directories: Check out blog directories or aggregators that list blogs accepting guest posts. They’re like treasure maps that can lead you to websites with sky-high domain authority in your niche. X marks the spot!
  3. Follow the influencers: Keep an eye on your industry influencers’ websites or blogs. These big shots often accept guest posts and can give you the exposure you’re craving. Ride the wave of their domain authority!
  4. Search engine is your friend: Fire up Google or Bing and start searching for guest blogging opportunities in your niche. Look for websites that dominate the search rankings, have a solid online presence, and are well-respected in your industry. Go big or go home!
  5. Spy on your competitors: Sneak a peek at your competitors’ backlinks. If they have links from reputable websites with high domain authority, those websites might just be perfect for your guest posts too. Follow the breadcrumbs to success!
  6. Social media sleuthing: Check out social media platforms like LinkedIn and Twitter. Many website owners and bloggers share guest blogging opportunities on their profiles. Stay tuned and be ready to pounce on those high domain authority websites!
  7. Join the guest blogging party: Join online communities or forums dedicated to guest blogging. Fellow bloggers often share opportunities and insider tips. It’s a goldmine for finding websites with killer domain authority!

Just remember to always check the domain authority of each website using reliable SEO tools and follow their guest posting guidelines to the letter. Be authentic and tailored in your guest posts, and you’ll rock those high domain authority websites like a pro! Keep slaying, my friend! Kapil out! 🎯🔥

What are the best practices for submitting a guest post?

So, you wanna know the best practices for submitting a guest post, eh? Here’s my take, Kapil-style!

  1. Stick to the rules, bro: Read and follow the guest posting guidelines of the website or blog you’re submitting to. Don’t mess around with the word count, formatting, or other requirements. Show some pro-level respect!
  2. Know your audience, dude: Do your homework and understand the readers of the website or blog. Get a feel for their vibe, style, and preferences. Then, craft your guest post accordingly to hit them right in the feels!
  3. Stay original, man: Don’t copy-paste, bro! Submit only fresh, original content that hasn’t been published elsewhere. Give credit where it’s due and avoid any shady business. Keep it real!
  4. Quality is key, dude: Bring your A-game! Write a killer guest post that’s well-written, engaging, and informative. Drop some knowledge bombs, share some wisdom, and make their jaws drop in awe!
  5. Bring the visuals, bro: Spice it up with visuals, man! Use eye-catching images, dope infographics, or cool videos to level up your guest post. Visuals are like the cherry on top, making your content pop!
  6. No typos, bro: Double-check your work, man! Proofread and edit your guest post like a boss. Ain’t nobody got time for grammar or spelling errors. Keep it sharp and on point!
  7. Follow up like a pro, dude: Be cool and follow up politely, man! Ask about the status of your guest post in a pro-level manner. Patience is key, so don’t be pushy or annoying. Stay chill!
  8. Promote like a boss, bro: If your guest post gets published, shout it from the rooftops! Share it on your social media, website, or blog. Show some love and engage with readers’ comments like a rockstar!

Remember, bro, guest blogging is all about building relationships, delivering value, and establishing yourself as an expert. Follow these best practices, and you’ll rock that guest post submission like a pro! Keep slaying, my friend!

Step 2: Choose a Relevant and Interesting Topic

So, you’ve found some websites that accept guest posts, huh? Now it’s time to pick a topic that’ll knock their socks off! Here’s my advice, Kapil-style!

  1. Stay relevant, bro: Your topic should match the website’s niche and audience. Don’t go off on a wild tangent, man! Keep it aligned with what they’re all about and what their readers dig. It’s all about delivering value!
  2. Skip the self-promo, dude: Don’t be that guy who’s all about “me, me, me.” Avoid topics that are too promotional or self-serving. Nobody wants to read an advert, man! Keep it genuine and helpful.
  3. Do some keyword swag, bro: Get your keyword research on, dude! Use keyword research tools to find popular and relevant keywords in your niche. Look for ones with high search volume and low competition. That way, you’ll rank like a boss!
  4. Google is your bro, man: Google’s got your back, buddy! Use their autosuggestion feature to find out what questions people are asking related to your niche. These can be goldmine topic ideas for your guest post. Solve their problems, and you’ll be a hero!
  5. Be interesting, bro: Don’t be a snooze-fest, man! Choose a topic that’s interesting, captivating, and unique. Add your own twist, share some juicy insights, and make it a must-read for their readers. Be the life of the guest post party!

Remember, bro, your topic is the foundation of your guest post. Keep it relevant, valuable, and engaging. Show some love to their audience, and you’ll be on your way to guest post greatness!

How can I find popular keywords for my guest post?

So, you wanna know how to find popular keywords for your guest post, huh?

  1. Get your keyword tools on, bro: There are plenty of keyword research tools out there, man! Google Keyword Planner, SEMrush, Ahrefs, and Moz are some popular ones. Use them to find keywords with high search volume and low competition. It’s like hitting the keyword jackpot!
  2. Check out the competition, dude: See what your rivals are up to, man! Look at the keywords they’re targeting in their content. It can give you some serious inspiration for your guest post. Keep an eye on their moves!
  3. Google autosuggest is your bro: Google’s got some tricks up its sleeve, buddy! Type in your main keyword in the search bar and see what suggestions it gives you. These are popular search queries related to your keyword. It’s like tapping into the mind of the searchers!
  4. Check out the forums, man: Forums are a treasure trove of keyword ideas, bro! Look for threads related to your niche and see what questions people are asking. These are real-life keywords that people are searching for. It’s like getting insider info!
  5. Be specific, dude: Long-tail keywords are your friends, man! Instead of going for generic keywords, be more specific. Look for keywords that are more targeted and have less competition. They can be your secret sauce for ranking higher!
  6. Listen to your audience, bro: Your audience knows best, amigo! Listen to their needs, concerns, and questions. Use their language and vocabulary to find relevant keywords. It’s like speaking their language and connecting on a deeper level!

Remember, bro, finding popular keywords is all about understanding your audience, using the right tools, and getting creative. Don’t be afraid to experiment, and keep refining your keyword game.

Step 3: Write High-Quality and SEO-Optimized Content

When it comes to writing a killer guest post, quality is king, and I ain’t joking! Your content needs to be on point, well-written, engaging, and informative. No sloppy grammar or spelling mistakes, man. Keep it professional and polished!

And here’s a pro tip, bro: SEO is the name of the game! Optimize your guest post for search engines by including your target keywords in the title, headings, and throughout the content in a natural way. Break your content into sections with subheadings to make it easy to read, and drop some relevant links to authoritative sources to back up your points. It’s like adding some turbo boost to your post!

But hold up, that’s not all! Plagiarism is a big no-no, bro. Keep it original and unique. Don’t copy and paste from other sources, man. It’s not cool and can seriously harm your rep as a blogger. Use plagiarism-checking tools to make sure your content is legit and one-of-a-kind.

So, remember, buddy, rock that guest post with top-notch quality, killer SEO, and originality. Your post will shine like a star in the guest blogging galaxy!

How can I optimize my guest post for SEO?

Optimizing your guest post for SEO is key to getting it noticed by search engines and ranking higher in search results. Here are some tips to help you out, all in my own unique style, bro!

  1. Do your keyword research: Use keyword research tools to identify popular and relevant keywords in your niche. Look for keywords with high search volume and low competition, and sprinkle them naturally throughout your post. But don’t go overboard, man. Keep it natural, like a smooth groove.
  2. Title tag and meta description: Make sure your guest post has a catchy and relevant title tag that includes your target keyword. Write a compelling meta description that summarizes what your post is about and includes your keyword too. It’s like giving your post a cool intro!
  3. Headings and subheadings: Use headings and subheadings to structure your content and make it easy to read. Include your keywords in some of the headings, but don’t force it, bro. Keep it flowing like a smooth rap verse.
  4. Content quality: Don’t skimp on the quality of your content, man. Keep it top-notch, well-written, and engaging. Avoid stuffing your post with keywords, and focus on providing value to your readers. Quality over quantity, bro!
  5. Internal and external links: Add relevant internal links to other posts on your website to help readers navigate and explore your content. Also, include external links to authoritative sources that back up your points. It’s like building a network of links, bro!
  6. Image optimization: Optimize your images by using descriptive file names and alt tags that include your keywords. This can help with image search results and overall SEO, bro.
  7. Social sharing: Encourage social sharing of your guest post by including social media buttons. More shares mean more visibility, bro!

Remember, amigo, SEO is like a dance. Keep it smooth, natural, and high-quality. Your guest post will rock the search engine rankings like a boss!

What are some common mistakes to avoid in guest blogging?

Avoiding mistakes is key to nailing your guest blogging game, bro! Here are some common ones to watch out for:

  1. Irrelevant and low-quality content: Don’t submit content that is not aligned with the website’s niche or audience. Also, make sure your content is well-written, engaging, and informative. Avoid grammar and spelling mistakes, bro. Quality is king!
  2. Overly promotional or self-serving content: Guest blogging is not about promoting yourself or your products/services excessively. Avoid overly promotional or self-serving content, as it’s unlikely to be accepted by website owners. Keep it informative and value-packed for readers.
  3. Ignoring guest post guidelines: Every website has its own guest post guidelines, bro. Ignoring them is a big no-no. Make sure to read and follow the guidelines carefully, including word count, formatting, and other specific requirements. Don’t skip this step, bro!
  4. Lack of proper attribution: Always give credit where it’s due, man. Don’t forget to attribute any quotes, data, or references to their original sources. Plagiarism is a big mistake that can harm your reputation as a blogger. Keep it authentic and original, bro!
  5. Poor outreach and follow-up: Building relationships with website owners is important, bro. Avoid generic or spammy outreach emails, and personalize your pitches. Follow up politely but not excessively. Building genuine connections is the way to go!
  6. Not engaging with readers and website owners: Guest blogging is not just about getting backlinks, bro. It’s also about building relationships and engaging with readers and website owners. Respond to comments on your guest post, share your post on social media, and show appreciation to website owners for giving you the opportunity. Keep it friendly and interactive!
  7. Not optimizing for SEO: SEO is crucial for guest blogging success, bro. Don’t forget to optimize your guest post for search engines by using relevant keywords, headings, meta tags, and image optimization. SEO is like a superpower for boosting your visibility and rankings!

Avoiding these common mistakes will help you ace your guest blogging game, bro! Keep it authentic, value-packed, and engaging, and you’ll rock the guest blogging world like a pro! 👊🔥

Conclusion

Guest blogging can be a lucrative way to earn money online while providing valuable content to websites. By following the steps outlined in this blog post, you can increase your chances of creating a successful guest post that ranks high on Google and provides value to readers. Remember to find relevant websites that accept guest posts, choose interesting topics, write high-quality and SEO-optimized content, humanize your blog post with personal stories, and answer common questions people ask. With consistent effort and quality content, you can achieve success in guest blogging and earn money while building your brand as a blogger. Happy guest blogging!

Artificial intelligenceMachine learningData scienceBlockchainCryptocurrencyInternet of Things (IoT)CybersecurityCloud computingVirtual realityAugmented realityBig dataQuantum computingRobotics5G technologyAutomationNatural language processingBiotechnologyRenewable energySmart citiesE-commerceDigital marketingSocial mediaMobile appsInternet of Everything (IoE)Cognitive computingBioinformaticsWearable technologyHuman-computer interactionComputer visionGeolocationBiometricsCyber-physical systemsPredictive analyticsCloud storageEdge computingQuantum communicationNanotechnologyGene editingInternet privacyArtificial neural networksBiohacking3D printingSmart agricultureGenetic algorithmsInternet of Medical Things (IoMT)Quantum cryptographyDrone technologySmart homesComputer-aided design (CAD)Machine visionChatbotsGesture recognitionBioelectronicsInternet of Vehicles (IoV)Blockchain technologyHumanoid robotsSmart transportation

Homepage : Sarkarijindagi

How to make a youtube short blow up: Tips and Tricks for Viral Success

How to make a youtube short blow up

How to make a youtube short blow up

With the rise of TikTok and Instagram Reels, short-form video content has become increasingly popular on social media platforms. YouTube Shorts provide creators with a new outlet to share their work with the world. But how can you make your YouTube Short go viral? In this article, we’ll give some tips and tricks for crafting and promoting your YouTube shorts so you can increase views, engagement, and grow your audience.

How to Make a YouTube Short Blow Up: Tips and Tricks for Viral Success

Understanding YouTube Shorts: What They Are and How They Work

Before we dive into the tips and tricks for making your YouTube short successful, let us first take a closer look at what YouTube Shorts are and how they function.

  1. YouTube Shorts are vertical videos of up to 60 seconds in duration.
  2. YouTube App – Create and upload directly from the app!
  3. YouTube Shorts can be found in a dedicated section on the app, as well as within your home feed and search results.
  4. Similar to regular YouTube videos, Shorts can be discovered through keywords, hashtags and the YouTube algorithm.

Youtube shorts hacks

Tip #1: Keep It Short and Sweet

YouTube Shorts are known for their concise nature. To ensure your short succeeds, keep it short and sweet. Here are some tips for crafting concise yet captivating content:

  1. You should Focus on one topic or idea for every video
  2. Always Keep your video under 60 seconds time slot
  3. Use eye catching visuals and graphics to capture your viewers’ attention.
  4. Use text overlays to quickly and clearly communicate your message.
  5. At end include a clickable call-to-action to encourage viewers to interact with it.

Tip #2: Get Creative with Your Content

To stand out and make your YouTube short successful, you need to get creative with its content. Here are some ideas for inspiration:

  • Use humor to engage your viewers.
  • Create a DIY or how-to video that offers value to your audience.
  • Give us a glimpse into your life or work from behind the scenes.
  • Collaborate with other creators to reach new audiences.
  • Utilize trending topics or challenges to stay abreast of what’s popular on social media.

Tip #3: Optimize Your Video for Discovery

Even the best YouTube Shorts won’t go viral unless they can be discovered. Here are some tips for optimizing your video for discovery:

  • Use relevant keywords and hashtags in your video title, description, and tags.
  • Create an eye-catching thumbnail that accurately represents your video.
  • Encourage your followers to visit and subscribe to your YouTube Shorts channel by spreading the word through other social media channels.
  • Establish a connection with your viewers by responding to comments and creating an atmosphere of community around your content.

How can I promote my YouTube Shorts?

If you want to get more views and engagement for your YouTube Shorts video content, there are several methods you can employ that could be effective. One option is sharing them on other social media sites like Twitter, Facebook, or Instagram. Also beneficial is collaborating with fellow creators within your niche or community to extend reach outside of traditional circles. Make sure that significant hashtags are included in the video’s subject line as well as in its narrative text so others who may be interested will easily notice it online! Lastly but importantly – always respond thoughtfully when someone makes a remark because doing this helps cultivate strong bonds between viewers/viewership.

How often should I upload YouTube Shorts?

Your YouTube Shorts upload frequency will depend on your audience and what type of content you create. Some creators upload daily, while others upload weekly or even monthly. The important thing is being consistent while creating quality material that resonates with viewers.

How can I optimize my YouTube Shorts for the algorithm?

YouTube Shorts is a great way for creators looking to improve their visibility on the platform via optimized algorithmic reach. To get started off right, make sure that you be comprehensive by including relevant keywords and hashtags within multiple areas like video titles, descriptions, and tags. Selecting the best possible thumbnail which can both represent your brand while being eye-catching can play a huge role towards enhancing engagement rates such as likes or comments from viewers. Captivating visual elements along with good-quality sound are key when trying to keep users engaged over time which will increase retention rate per SEO guidelines related to this type of content strategy.

Conclusion

Making a YouTube short success may seem intimidating, but with the right approach and strategy you can increase views, engagement, and build an engaged following. By creating concise yet captivating content, getting creative with ideas, and optimizing for discovery on YouTube Shorts, you’ll be well on your way to viral success on this platform. Stay consistent with posts and engage with viewers regularly to build a sense of community around your channel. With these tips in hand, you’ll have no problem making that YouTube short go viral in no time!

FAQs

How can I see how many views my YouTube Shorts have?

You can see how many views your Shorts have by going to your YouTube channel and selecting the “Shorts” tab. From there, you can view analytics for your Shorts, including views, likes, and comments.

Can I monetize my YouTube Shorts?

Yes, YouTube Shorts are eligible for monetization if you meet the platform’s monetization criteria. This includes having at least 1,000 subscribers and 4,000 watch hours in the past 12 months.

Pros and cons of doctors without borders

Pros and cons of doctors without borders

In this blogpost,we will discuss Pros and cons of doctors without borders.

Explanation of Doctors Without Borders

Doctors Without Borders (MSF), also known as Medecins Sans Frontieres (MSF), is an international humanitarian organization that provides medical assistance to people affected by conflict, epidemics, natural disasters and other emergencies around the world. Established in 1971 by a group of doctors and journalists who responded to a humanitarian crisis caused by Biafran war in Nigeria, MSF has since blossomed into one of the world’s leading humanitarian groups with offices and projects located in over 70 countries around the world.

MSF provides medical assistance, including emergency medical care, surgical procedures, vaccinations and disease control to those in need regardless of race, religion or political affiliation. Furthermore, the organization advocates for policies and practices that guarantee access to high-quality healthcare for all regardless of circumstance.

Doctors Without Borders is composed of medical professionals, logistics and administrative staff, as well as support personnel that collaborate to provide lifesaving medical care to those in need. To fund its operations, Doctors Without Borders relies solely on donations from individuals, governments and other organizations; no funding is accepted from any political or government organizations.

Pros of Doctors Without Borders

Doctors Without Borders (MSF), also known as Medecins Sans Frontieres (MSF), is an internationally acclaimed humanitarian organization that provides essential medical support to people affected by crisis situations around the world. Some of its most notable benefits include:

  1. Fast Response Time: MSF has earned a reputation for being one of the first organizations to respond in emergency situations, offering lifesaving medical care to people facing dire circumstances quickly and efficiently.
  2. Highly Skilled Medical Professionals: The organization’s medical professionals are highly qualified and experienced, enabling them to provide specialized healthcare in challenging environments.
  3. MSF Provides Objective Medical Care: MSF strives to provide impartial medical care to people in need, regardless of race, religion or political affiliation. This commitment guarantees that everyone has access to quality healthcare when it’s most needed.
  4. Advocacy: MSF advocates for policies and practices that ensure access to medical care for all people, even those facing the most challenging circumstances. This advocacy work is essential in making healthcare systems around the world more equitable and accessible.
  5. Transparency: The organization operates with transparency, sharing information about their work and finances with the public. This openness fosters trust and accountability, ensuring donor funds are used wisely and efficiently.

MSF’s quick response time, highly skilled medical professionals, impartial care, advocacy work and transparency are some of its greatest assets. These elements enable them to provide crucial medical assistance worldwide, making a real difference in people’s lives.

Cons of Doctors Without Borders

Doctors Without Borders (MSF) is a widely praised humanitarian organization that provides essential medical support to people affected by crisis situations around the world, but there are some drawbacks associated with its work. Some of these key drawbacks include:

  1. Security Risks: MSF operates in some of the world’s most hazardous environments, where security risks are high. As a result, their medical professionals are often exposed to potentially hazardous situations which may put their safety at risk.
  2. Limited Resources: MSF relies on donations from individuals, governments and other organizations to fund its operations. Unfortunately, these contributions can be insufficient, hindering the organization’s capacity to respond effectively to emergencies.
  3. Cultural Barriers: MSF operates in a variety of cultural environments, which can present difficulties for its medical professionals. Disparities, language barriers and differing attitudes towards healthcare can all have an effect on how effective MSF’s operations are run.
  4. Lack of Sustainability: MSF’s operations often revolve around providing emergency medical care, rather than creating sustainable healthcare systems. This can lead to a lack of long-term solutions since most resources are allocated towards meeting immediate medical requirements.
  5. Overreliance on Western Medical Practices:MSF’s medical professionals often rely on Western medical practices, which may not always be suitable for the cultural and social environments in which they operate.

MSF’s work is highly praised, yet there are also some drawbacks. Security risks, limited resources, cultural barriers, lack of sustainability and an overreliance on Western medical practices are just a few examples. Addressing these obstacles will ensure MSF can continue providing vital medical assistance in times of crisis around the world.

Examples of Doctors Without Borders Missions

Here are some examples of Doctors Without Borders missions:

  1. Ebola Outbreak in West Africa: In 2014, Doctors Without Borders responded to the deadly Ebola outbreak in West Africa. They sent hundreds of medical professionals to Guinea, Sierra Leone and Liberia in order to provide medical care – including isolation and treatment centers – for those affected by the disease.
  2. Refugee Crisis in Syria and Neighboring Countries: Doctors Without Borders has been providing medical aid to people affected by the ongoing conflict in Syria since 2011. Furthermore, they have responded to refugee crises across neighboring countries by providing healthcare in refugee camps and other settings.
  3. Earthquake in Haiti: Doctors Without Borders was on-the-ground to provide medical care and other support to people affected by the 2010 earthquake in Haiti, setting up mobile clinics and hospitals to treat injuries and provide other necessary needs.
  4. HIV/AIDS in South Africa: Doctors Without Borders has been providing medical care and treatment to people living with HIV/AIDS in South Africa since 2000. Their clinics and other facilities offer antiretroviral therapy and other treatments for those affected by the disease.
  5. Rohingya Refugee Crisis in Bangladesh: Doctors Without Borders has been providing medical assistance to Rohingya refugees who have fled violence and persecution in Myanmar since 2017. Their organization has established clinics and other medical facilities so they can provide care to people with injuries, illnesses, and other urgent medical needs.

Doctors Without Borders has been actively engaged in many missions around the world, providing vital medical assistance to people affected by crisis situations. These missions range from responding to disease outbreaks and providing medical care in conflict zones and refugee crises to setting up clinics and other facilities that could treat people with various medical needs.

Comparison with Other Healthcare NGOs

Here is a comparison between Doctors Without Borders and other healthcare NGOs:

  1. International Medical Corps: The International Medical Corps (IMC) is an NGO that offers emergency medical assistance in emergency situations. Much like Doctors Without Borders, IMC provides healthcare to conflict zones, responds to disease outbreaks and assists refugees. Furthermore, they work towards creating sustainable healthcare systems, training local medical professionals and offering mental health services.
  2. Save the Children: Save The Children is a global humanitarian organization that provides aid to children and families affected by conflict, natural disasters, and other crises. In addition to healthcare services, Save The Children also focuses on other areas such as education, child protection and nutrition – unlike Doctors Without Borders which is strictly medical-focused. By offering an array of services for support of both children’s wellbeing and that of their families and communities alike, Save The Children has earned its name.
  3. World Vision: World Vision is a global humanitarian organization that offers assistance to children and families affected by crises. Like Save the Children, they offer healthcare, education, nutrition – but their focus also extends to community development, sustainable agriculture, and economic empowerment. Unlike Doctors Without Borders which primarily provides medical care in crisis situations, World Vision focuses on long-term development and community empowerment.
  4. Red Cross: The Red Cross is a global humanitarian organization that offers assistance to people affected by conflict, natural disasters and other crises. Like Doctors Without Borders, it offers emergency medical aid in crisis situations but also concentrates on other areas like disaster preparedness, blood donation and promoting international humanitarian law. Unlike Doctors Without Borders which is solely medical-focused organization, the Red Cross provides various services for those affected by crises.

Doctors Without Borders is a well-respected healthcare NGO that provides essential medical assistance in crisis situations. But other organizations offer similar and complementary services as well, such as International Medical Corps, Save the Children, World Vision, and Red Cross. Each organization has its own focus and strengths; together they form an interconnected network of support for people affected by crises around the world.

Doctors Without Borders controversy

Doctors Without Borders has, like any organization, faced controversy and criticism throughout its history. Here are a few examples:

  1. Neutrality: Doctors Without Borders adheres to the principle of neutrality, offering medical assistance to anyone in need regardless of political affiliation or other factors. However, some critics have accused the organization of not being sufficiently neutral, particularly in conflict zones where boundaries between combatants and civilians may be fuzzy.
  2. Security: Doctors Without Borders operates in some of the world’s most hazardous regions, and its staff members face significant threats to their safety and security. Some critics have accused them of not doing enough to safeguard staff members or adequately assess potential risks when working in certain regions.
  3. Fundraising and Public Relations: Doctors Without Borders is a large organization with an impressive budget, yet some critics have accused it of being overly focused on fundraising and public relations activities. Critics contend that Doctors Without Borders should prioritize providing medical assistance instead of marketing itself to donors and the general public.
  4. Sexual Exploitation and Abuse: Doctors Without Borders has faced allegations of sexual exploitation and abuse among its staff members, similar to other humanitarian organizations. To address these matters, Doctors Without Borders established a Code of Conduct and implemented training programs for staff members.

Doctors Without Borders has faced criticism and controversy throughout the years, particularly regarding neutrality, security, fundraising and public relations matters, as well as sexual exploitation and abuse. Nonetheless, they have taken steps to address these concerns while continuing to provide essential medical assistance to people affected by crises around the world.

Doctors Without Borders review

When researching Doctors Without Borders reviews, it’s essential to remember that they are highly regarded in the humanitarian community for providing lifesaving medical assistance during crisis situations. Their record of providing healthcare in conflict zones, responding to disease outbreaks and helping refugees is impressive – so much so that Doctors Without Borders won numerous awards including the Nobel Peace Prize in 1999 for their efforts.

Though the organization has faced criticism and controversy in the past, particularly regarding issues related to neutrality, security, fundraising and public relations, as well as sexual exploitation and abuse, it has also taken steps to address these concerns and enhance its operations.

Overall, Doctors Without Borders is an essential organization that provides essential medical assistance to people affected by crises around the world. If you would like to support this cause, you can donate funds or explore volunteering and employment opportunities with Doctors Without Borders.

Is Doctors Without Borders a good charity?

Doctors Without Borders is widely regarded as a worthy charity by those in the humanitarian community. With its impressive record of providing lifesaving medical assistance in crisis situations and numerous awards to its name, it has earned itself a place of honor within this sector.

Doctors Without Borders is widely renowned for its financial transparency and accountability. The organization posts detailed financial reports and has earned high ratings from independent charity evaluators such as Charity Navigator and GuideStar.

Doctors Without Borders has faced criticism and controversy throughout the years, particularly around matters related to neutrality, security, fundraising and public relations, sexual exploitation and abuse. Before making a donation or supporting this organization’s work, research its mission statement and values thoroughly.

Doctors Without Borders is an acclaimed humanitarian organization that provides essential medical aid to people affected by crises around the world. If you would like to support their work, you can donate or explore volunteering or employment opportunities with Doctors Without Borders.

What is it like to work with Doctors Without Borders ?

Working with Doctors Without Borders can be both a humbling and rewarding experience. The organization operates in some of the world’s most dangerous regions, placing its staff members under intense stress and uncertainty.

Doctors Without Borders recruits staff members from a variety of backgrounds, such as medical professionals, logisticians, administrators and more with relevant skills and experience. Typically, Doctors Without Borders requires at least several month commitment for its international assignments; staff may even have to work in remote or isolated areas with limited resources.

Doctors Without Borders is an organization that offers unparalleled opportunities for rewarding work. People who have worked there describe it as incredibly rewarding; you have a chance to make a meaningful impact on people affected by crises around the world, while working alongside an enthusiastic and dedicated team of professionals. Despite all these obstacles, many who have worked there describe it fondly.

If you are interested in working with Doctors Without Borders, you can explore current job and volunteer opportunities on their website. Furthermore, you can connect with current and former staff members to gain more insight into their experiences working there.

Is it safe to work with Doctors Without Borders?

Working with Doctors Without Borders can be a challenging and potentially hazardous endeavor, as the organization often works in crisis areas or conflict zones around the world. Nonetheless, Doctors Without Borders takes significant measures to guarantee the safety and security of its staff members.

Doctors Without Borders has developed a robust security protocol that includes risk assessments, training for staff in the field, and ongoing support for staff members. Furthermore, the organization has stringent policies and procedures regarding personal protective equipment usage, emergency medical response capabilities, as well as incident reporting.

Doctors Without Borders is known for its commitment to safety and security, yet there is always some risk involved when working with them. Staff members may face unpredictable situations such as violence, disease outbreaks, natural disasters and more; yet the organization has a well-deserved reputation of providing its staff members with all of the support they need to carry out their tasks effectively and securely.

If you are considering working with Doctors Without Borders, it’s essential to carefully assess the risks involved and take all necessary precautions for your own safety. While the organization provides extensive training and support to its staff members, having a strong sense of self-care and being aware of one’s own limits and boundaries is also essential.

What are the ethical issues with doctors without borders?

Doctors Without Borders (MSF) has faced several ethical dilemmas over the years, particularly related to neutrality, security, fundraising and public relations, as well as sexual exploitation and abuse.

One of the greatest ethical challenges Doctors Without Borders faces is upholding neutrality in conflict zones and other crisis situations. Their mission is to provide medical care to everyone regardless of political or social affiliation, yet in some cases their presence and activities have been seen as aligning with one side in a conflict, potentially jeopardizing their neutrality.

Doctors Without Borders has also come under fire for its security protocols, particularly when staff members are vulnerable to violence or kidnapping. Critics accuse the organization of prioritizing staff safety over community needs and being overly cautious when responding to crises.

Fundraising and public relations are crucial ethical considerations for Doctors Without Borders, as the organization relies heavily on donations from individuals and governments to fund its operations. Some critics have argued that Doctors Without Borders’ fundraising appeals and media coverage can be sensationalist or exploitative, placing fundraising needs ahead of those it serves.

Finally, Doctors Without Borders has faced significant ethical dilemmas related to sexual exploitation and abuse by staff members. While the organization has taken measures to address this problem, such as implementing policies that prevent such activities and supporting survivors of abuse, incidents of such conduct continue to occur – underscoring the ongoing ethical problems confronting Doctors Without Borders.

Doctors Without Borders is a highly respected humanitarian organization, but it has faced significant ethical difficulties over time. While they have taken steps to address these concerns, ongoing vigilance and attention to ethical matters are necessary in order to guarantee that the organization continues operating with integrity and effectiveness.

What is the use of doctors without borders?

Doctors Without Borders (Medicins Sans Frontieres or MSF) is a humanitarian organization that provides medical assistance to people affected by crises such as armed conflict, natural disasters, epidemics and other emergencies. Established in 1971 in response to Biafra’s humanitarian crisis in Nigeria, MSF has since provided care to millions across 70 countries around the world.

Doctors Without Borders’ primary mission is to provide medical care to people in need, regardless of race, religion or political affiliation. They work in some of the world’s most difficult and dangerous places such as conflict zones, refugee camps and areas affected by disease outbreaks or natural disasters. Their teams of medical professionals, logisticians and other specialists offer a range of services such as emergency medical care, surgery, vaccinations nutrition support mental health care support – and more.

Doctors Without Borders is known for its medical work and also advocates on behalf of those affected by crises, raising awareness about humanitarian issues. The organization fights for access to essential medicines and healthcare, as well as speaking out against the causes of these crises such as poverty, inequality, and conflict.

Doctors Without Borders’ mission is to provide life-saving medical care and assistance to people affected by crises around the world, while also advocating for their rights and addressing the underlying causes of these emergencies.

Doctors without borders written test

Doctors Without Borders typically recruits medical professionals with extensive experience, and may administer assessments to evaluate candidates’ knowledge and skills. These could include medical knowledge tests, situational judgment tests or other types of evaluations.

Doctors Without Borders evaluates candidates based on more than just medical assessments; they’re evaluated based on personal and professional attributes like their resilience in challenging environments, adaptability, and commitment to humanitarian principles.

If you are interested in working with Doctors Without Borders, I recommend visiting their website and reviewing their recruitment process to gain a better insight into what to expect. They provide details on recruitment requirements as well as the steps involved when applying for a position.

Doctors without borders salary

Doctors Without Borders field workers receive salaries that are determined by their role, experience and location of assignment. As a humanitarian organization, Doctors Without Borders strives to offer competitive compensation packages in order to attract and retain highly qualified personnel.

Doctors Without Borders website states that compensation for field workers includes a salary, per diems and other benefits such as health insurance, travel expenses and housing. Salaries are determined based on local cost of living, assignment scope and level of responsibility.

Doctors Without Borders medical professionals typically earn salaries that are competitive with those of their home countries, plus additional benefits like travel allowances and health insurance. It’s worth remembering that field workers for Doctors Without Borders often work in challenging and unpredictable environments; therefore, their compensation must reflect the risks and difficulties involved with this work.

Doctors Without Borders field workers earn salaries that vary based on a variety of factors. Ultimately, the organization strives to offer competitive compensation packages that reward staff members for their skills, experience and dedication.

Disclaimer: This information is not exhaustive and is intended for informational purposes only. The views and opinions expressed here are taken from different sources of internet and most from Chatgpt and do not necessarily reflect the official policy or position of any organization.

Homepage : Sarkarijindagi

Everything You Need to Know About com.dti.folderlauncher

com.dti.folderlauncher

If you’ve ever taken a look at your device’s file system, you may have notice a package name called “com.dti.folderlauncher.” While the name itself may not provide any immediate context, it is actually a package name that refers to a specific app or utility that is install on your device. In this blog post, we’ll explore everything you need to know about com.dti.folderlauncher, including what it is, how it is used, why it’s important, and how to troubleshoot any issues you may encounter.

What is com.dti.folderlauncher?

Com.dti.folderlauncher is a package name that refers to a specific app or utility installed on your device. In most cases, this app or utility serves to manage and organize folders on your device. Depending on the specific version of the app or utility, com.dti.folderlauncher may offer a variety of features and functionalities, such as the ability to create, delete, or move folders, or to customize the appearance and layout of your device’s file system.

How is com.dti.folderlauncher used?

The specific use cases for com.dti.folderlauncher will depend on the version of the app or utility that is installed on your device. However, in general, com.dti.folderlauncher is used to manage and organize folders on your device. Some possible use cases for com.dti.folderlauncher may include:

  • Creating new folders on your device
  • Deleting or moving existing folders
  • Customizing the appearance and layout of your device’s file system
  • Changing the names of folders or modifying their properties
  • Accessing hidden folders or files on your device

To access com.dti.folderlauncher on your device, you will typically need to navigate to your device’s settings or file system. The specific steps for accessing com.dti.folderlauncher may vary depending on the device and operating system you are using.

Why is com.dti.folderlauncher important?

Com.dti.folderlauncher is an important package name because it can help you to better manage and organize the files and folders on your device. By using com.dti.folderlauncher, you can streamline your device’s file system and make it easier to find and access the files and folders you need. Additionally, using com.dti.folderlauncher can help to improve the overall performance and functionality of your device by reducing clutter and improving system efficiency.

How do I troubleshoot issues with com.dti.folderlauncher?

While com.dti.folderlauncher can be a useful app or utility, you may encounter issues or errors when using it. Some common issues with com.dti.folderlauncher may include:

  • Difficulty accessing the app or utility on your device
  • Error messages or crashes when using the app or utility
  • Issues with creating, deleting, or moving folders on your device

If you encounter any of these issues, there are several troubleshooting steps you can take. First, try restarting your device and attempting to access com.dti.folderlauncher again. If this does not resolve the issue, you may need to update the app or utility or seek additional support from the manufacturer or your device’s support team.

Conclusion

In conclusion, com.dti.folderlauncher is an important package name that refers to a specific app or utility installed on your device. By understanding what com.dti.folderlauncher does and how it is used, you can make the most of this app or utility and optimize your device’s functionality. If you encounter any issues or errors with com.dti.folderlauncher, there are several troubleshooting steps you can take to resolve the issue and ensure that your device’s file system is running smoothly.

FAQs

What devices is com.dti.folderlauncher available on?

Com.dti.folderlauncher is typically available on devices running the Android operating system. It may be pre-installed on some devices, or available for download from the Google Play Store or other app marketplaces.

Is com.dti.folderlauncher a free app?

The specific cost of com.dti.folderlauncher may vary depending on the version of the app or utility that is installed on your device. Some versions of com.dti.folderlauncher may be free, while others may require payment or a subscription.

Can I uninstall com.dti.folderlauncher from my device?

In most cases, com.dti.folderlauncher can be uninstalled from your device using the standard uninstallation process. However, keep in mind that removing com.dti.folderlauncher may impact the functionality of your device’s file system and organization.

What should I do if I encounter an error with com.dti.folderlauncher?

If you encounter an error or issue with com.dti.folderlauncher, the first step is to try restarting your device and attempting to access the app or utility again. If this does not resolve the issue, you may need to update the app or utility or seek additional support from the manufacturer or your device’s support team.

Is com.dti.folderlauncher safe to use?

Com.dti.folderlauncher is generally considered safe to use. However, as with any app or utility, there may be some potential security risks or vulnerabilities associated with com.dti.folderlauncher. To ensure the safety and security of your device and personal data, be sure to download and use com.dti.folderlauncher from a trusted source, and keep your device’s security software up-to-date.

Troubleshooting the ‘zsh permission denied’ Error: Tips and Tricks for Zsh Shell Users

zsh permission denied

Understanding the “zsh permission denied” error

I would like to discuss the common error message that many Zsh shell users encounter: “zsh permission denied”. This error message typically appears when users try to execute certain commands or scripts, and it can be caused by a variety of factors.

Common causes of “zsh permission denied”

One of the most common causes of the “zsh permission denied” error is incorrect file permissions. If the file or directory in question does not have the correct permissions set, users may encounter this error when trying to access it. Other possible causes include insufficient user privileges, problems with the zsh shell itself, or conflicts with other system components.

Resolving the “zsh permission denied” error

To resolve the “zsh permission denied” error, there are several steps that users can take. First, it’s important to ensure that the file or directory in question has the correct permissions set. This can be done using the chmod command, which allows users to modify file permissions to allow for reading, writing, and executing.

Another potential solution is to check the user’s current privileges and make sure that they have sufficient access to the file or directory. This can be done by checking the user’s group memberships and modifying them if necessary.

Finally, if all else fails, it may be necessary to troubleshoot the Zsh shell itself to identify any underlying issues or bugs that may be causing the “zsh permission denied” error.

Tips for avoiding the “zsh permission denied” error in the future

To avoid encountering the “zsh permission denied” error in the future, users should take care to ensure that they have the necessary permissions and privileges before attempting to access or modify files or directories. It’s also a good idea to regularly review and update file permissions to ensure that they remain accurate and up-to-date.

What is zsh permission denied in Kali Linux?

“zsh permission denied” is an error message that occurs in Kali Linux when the user does not have sufficient permissions to access a file or directory using the Zsh shell. This error can be caused by incorrect file permissions, insufficient user privileges, or issues with the Zsh shell. To resolve the error, users may need to adjust file permissions, modify user privileges, or troubleshoot the Zsh shell.

How do I fix permission denied in Terminal Mac?

If you encounter a “permission denied” error in Terminal on a Mac, there are several steps you can take to resolve the issue:

  1. Check the file permissions: Use the “ls -l” command to check the permissions of the file or directory in question. If the file or directory has incorrect permissions, use the “chmod” command to modify the permissions accordingly.
  2. Use sudo: If the file or directory requires elevated privileges to access, use the “sudo” command before the command that you want to execute. This will allow you to execute the command with administrator privileges.
  3. Change the ownership: If you don’t have permission to access a file or directory because it is owned by another user, use the “chown” command to change the ownership of the file or directory to your user account.
  4. Disable SIP: If you are trying to access a system file or directory that is protected by System Integrity Protection (SIP), you may need to disable SIP temporarily to gain access. Note that disabling SIP can potentially compromise the security of your system, so use this option with caution.
  5. Use Recovery Mode: If none of the above solutions work, you can try booting into Recovery Mode and using the Terminal there to fix the permission issue.

By following these steps, you should be able to fix the “permission denied” error in Terminal on your Mac.

How do I unlock Zshrc files on Mac?

To unlock the .zshrc file on a Mac, you can use the “chmod” command to modify the file permissions. Here’s how you can do it:

  1. Open Terminal on your Mac.
  2. Navigate to the directory where the .zshrc file is located by using the “cd” command. For example, if the file is located in your home directory, you can use the command “cd ~”.
  3. Once you are in the directory where the .zshrc file is located, use the “ls -l” command to check the current file permissions.
  4. Use the “chmod” command to modify the file permissions. For example, if you want to give read, write, and execute permissions to the file owner, you can use the command “chmod 700 .zshrc”.
  5. Check the file permissions again using the “ls -l” command to confirm that the file has been unlocked.

Note that unlocking the .zshrc file can potentially compromise the security of your system, so it’s important to be careful when making changes to this file. Make sure you understand the potential implications of modifying the file before you proceed.

Conclusion

In conclusion, while the “zsh permission denied” error can be frustrating and confusing for users, there are several steps that can be taken to resolve the issue and regain access to the requested file or directory. By understanding the common causes of this error and following best practices for managing file permissions and user privileges, users can avoid encountering this issue in the future and continue using the powerful and versatile Zsh shell with confidence.

FAQs

What is the .zshrc file?

The .zshrc file is a configuration file for the Zsh shell, which is a popular alternative to the default Bash shell on Unix-based systems. The .zshrc file contains settings and configurations that customize the behavior of the Zsh shell.

Why do I need to unlock the .zshrc file?

The .zshrc file may be locked by default to prevent accidental or unauthorized modifications. If you need to make changes to the file, you will need to unlock it first.

How do I know if the .zshrc file is locked?

You can check the file permissions of the .zshrc file using the “ls -l” command in Terminal. If the file permissions show that the file is not writable, it may be locked.

What are the potential risks of unlocking the .zshrc file?

Unlocking the .zshrc file can potentially compromise the security of your system, especially if you make changes that affect system-wide settings or configurations. It’s important to understand the potential risks and implications of modifying this file before you proceed.

How do I lock the .zshrc file again?

If you want to lock the .zshrc file again after making changes, you can use the “chmod” command to modify the file permissions. For example, if you want to lock the file so that only the file owner can read and write to it, you can use the command “chmod 600 .zshrc”.

A Guide to Understanding com.qualcomm.atfwd on Your Android Phone

com.qualcomm.atfwd

Everything You Need to Know About com.qualcomm.atfwd on Your Android Phone

If you’re an Android phone user, you might have come across the com.qualcomm.atfwd process running on your phone. This process is a system application that provides communication between the Qualcomm chipset and the Android operating system. In this blog post, we will explore what com.qualcomm.atfwd is, its purpose, and how it affects your phone’s performance.

What is com.qualcomm.atfwd?

Com.qualcomm.atfwd is a system application that runs on Android devices with a Qualcomm chipset. It is responsible for handling various telephony related functions such as call handling and network communication. The acronym “atfwd” stands for “AT Framework Daemon”.

What is the purpose of com.qualcomm.atfwd?

com.qualcomm.atfwd’s main purpose is to communicate between the Qualcomm chipset and Android. It is a bridge between the two, allowing low-level interaction between the Android operating system and the hardware. Various telephony functions such as call handling and network communication are also handled by this process.

How does com.qualcomm.atfwd affect your phone’s performance?

Com.qualcomm.atfwd is an essential system process and turning it off may not cause problems with the performance of your phone. But in some cases, it can become overactive and drain your battery or slow down your phone. You can use Task Manager to monitor the process and see if it’s causing problems.

Can I uninstall com.qualcomm.atfwd from my Android device?

No, com.qualcomm.atfwd is a system application that cannot be uninstalled from your device. However, you may be able to disable it if needed.

How do I know if com.qualcomm.atfwd is causing errors on my Android device?

If you are experiencing errors or issues with your Android device, you can check the system logs to see if com.qualcomm.atfwd is mentioned as a potential cause. You can also try clearing the app’s cache or data to see if that resolves the issue.

Is com.qualcomm.atfwd service considered as bloatware?

It depends on the context. com.qualcomm.atfwd is a system service provided by Qualcomm that enables various features on Android devices, such as call forwarding and Wi-Fi hotspot. While some users may not use these features and consider it bloatware, others may find it useful. However, if you suspect that the service is causing performance issues or draining battery, you can disable it through the settings or by using a third-party app.

How can I update the com.qualcomm.atfwd process on my Android device?

The com.qualcomm.atfwd process is typically updated automatically through the Android system updates. To check for updates on your device, go to Settings > System > System updates. If an update is available, you can download and install it from there.

Can I disable com.qualcomm.atfwd?

Although it’s not recommended to disable com.qualcomm.atfwd, you can do it if you’re experiencing problems with it. However, please note that disabling this process may cause problems with your phone’s telephony functions and you may not be able to make calls or use data services. It’s recommended that you seek professional help before attempting to disable this process.

How to monitor com.qualcomm.atfwd on your Android phone?

If you want to monitor it on your Android phone, you can use a task manager application. The app will show you all the running processes on your phone, including com.qualcomm.atfwd. You can see how much memory and CPU the process is using and decide if it’s causing any problems.

How To Fix Com.qualcomm.atfwd Errors on Android?

To fix com.qualcomm.atfwd errors on Android, try clearing the cache and data of the affected app or performing a factory reset. If the issue persists, contact the app developer or your device manufacturer for further assistance.

In conclusion, it is a system process that plays a vital role in the communication between the Qualcomm chipset and the Android operating system. It handles various telephony functions, such as call handling and network communication. While it’s not recommended to disable this process, you can monitor it using a task manager and seek professional help if you’re experiencing any issues. By understanding com.qualcomm.atfwd and its purpose, you can have better control over your Android phone’s performance.

A Guide to Fix ‘AirTag Not Reachable’

AirTag Not Reachable

Troubleshooting AirTag Not Reachable

AirTag is Apple’s latest product that helps users keep track of their belongings. It is a small, circular device that can be attached to your keys, wallet, backpack, or any other valuable item, and it allows you to track its location using your iPhone or iPad. However, some users have reported that their AirTag shows the message “AirTag not reachable” on their devices. In this blog post, we will explore what this means and how to fix it.

What does “AirTag not reachable” mean?

When you set up an AirTag, it should be immediately recognized by your iPhone or iPad and listed as one of your devices in the Find My app. However, if you see the message “AirTag not reachable,” it means that your device is having trouble communicating with the AirTag. This can happen for several reasons, including:

  1. The AirTag is out of range: If your AirTag is too far away from your iPhone or iPad, it won’t be able to communicate with it. The range of an AirTag is about 30 feet or 10 meters.
  2. The AirTag is not turned on: Your AirTag needs to be turned on and paired with your iPhone or iPad to work. If it’s not turned on or has run out of battery, you won’t be able to track it.
  3. The AirTag is out of battery: AirTag uses a replaceable CR2032 battery that lasts for about a year. If the battery has run out, you’ll need to replace it.
  4. Interference: AirTag uses Bluetooth to communicate with your iPhone or iPad. If there’s too much interference from other Bluetooth devices, your AirTag may not be able to connect.

How to fix “AirTag not reachable”

How to fix "AirTag not reachable"
How to fix “AirTag not reachable”

If your AirTag is not reachable, there are several things you can do to fix it:

  1. Move closer to your AirTag: If your AirTag is out of range, move closer to it and see if your iPhone or iPad can detect it.
  2. Check the battery: If your AirTag has run out of battery, replace it with a new one. You can do this by twisting the back of the AirTag counter-clockwise.
  3. Restart your iPhone or iPad: Sometimes, restarting your iPhone or iPad can help fix connectivity issues. To do this, press and hold the power button until the “slide to power off” slider appears. Slide the slider to the right to turn off your device, then press and hold the power button again to turn it back on.
  4. Check for interference: If there’s too much interference from other Bluetooth devices, try turning them off and see if that helps. You can also try moving your AirTag away from other devices and see if that improves connectivity.

How to reset airtag ?

To reset an AirTag, follow these steps:

  1. Press and hold the silver button on the AirTag until you see the LED light flash white.
  2. Release the button and then press and hold it again until you see the LED light flash white again.
  3. Release the button again and the AirTag will reset.
  4. Once the AirTag has been reset, it will no longer be paired with your Apple ID and will need to be set up again if you want to use it.

Note that resetting an AirTag will also erase any location history associated with it. If you want to keep the location history, you should remove the AirTag from your Apple ID instead of resetting it.

Airtag not connecting to iphone

Airtag not connecting to iphone

If your AirTag is not connecting to your iPhone, here are a few things you can try:

  1. Make sure your iPhone is compatible with AirTag: AirTag is compatible with iPhones and iPads running iOS 14.5 or later. If your device is not running the latest version of iOS, update it.
  2. Ensure Bluetooth is turned on: AirTag uses Bluetooth to connect to your iPhone. Make sure Bluetooth is turned on in your iPhone’s settings.
  3. Check if your AirTag is turned on: Your AirTag needs to be turned on to connect to your iPhone. You can check if it’s turned on by pressing the silver button on the AirTag. If the LED light flashes, it means the AirTag is on.
  4. Move closer to the AirTag: If your AirTag is out of range, move closer to it and see if your iPhone can detect it. The range of an AirTag is about 30 feet or 10 meters.
  5. Restart your iPhone: Sometimes, restarting your iPhone can help fix connectivity issues. To do this, press and hold the power button until the “slide to power off” slider appears. Slide the slider to the right to turn off your iPhone, then press and hold the power button again to turn it back on.
  6. Reset the AirTag: If none of the above steps work, try resetting the AirTag. To reset it, press and hold the silver button on the AirTag until you see the LED light flash white. Release the button and then press and hold it again until you see the LED light flash white again. Release the button again and the AirTag will reset.

If you’ve tried all of these steps and your AirTag still won’t connect to your iPhone, you may need to contact Apple support for further assistance.

In conclusion, if you see the message “AirTag not reachable” on your iPhone or iPad, it means that your device is having trouble communicating with your AirTag. This can happen for several reasons, including being out of range, having a dead battery, or interference from other Bluetooth devices. However, there are several steps you can take to fix the issue, including moving closer to your AirTag, replacing the battery, restarting your device, or checking for interference. By following these steps, you should be able to get your AirTag up and running again in no time.

FAQs

What happens if AirTag is out of range?

If your AirTag is out of range, it means that it is too far away from your iPhone or iPad to communicate with it. This can happen if you leave your AirTag behind in a different location or if you move out of range while you are tracking it. When your AirTag is out of range, its location will not be updated on your device and you will not be able to see where it is.
If you think your AirTag may be out of range, try moving closer to it and see if your device can detect it. If you are still unable to connect with your AirTag, it may be helpful to check the battery level or make sure that the AirTag is turned on and paired with your device. If you are still having trouble, consider using the “Lost Mode” feature in the Find My app to receive a notification when your AirTag comes back into range.

How far is an AirTag reachable?

An AirTag is reachable within a range of approximately 30 feet or 10 meters from your iPhone or iPad. This means that if your AirTag is within this range, your device should be able to communicate with it and show you its location in the Find My app. However, if your AirTag is outside of this range, it may show the message “AirTag not reachable” on your device, indicating that it is having trouble connecting with your AirTag. In such cases, it’s important to move closer to your AirTag or check for other issues, such as battery life or interference from other Bluetooth devices.

Why is my Apple AirTag not locating?

If your Apple AirTag is not locating, there could be several possible reasons. First, make sure that your AirTag is turned on and in range of your iPhone or iPad. If your AirTag is out of range or not turned on, it won’t be able to communicate with your device. Also, check if your AirTag has a low battery, as this can also prevent it from being located. Another possible reason could be interference from other Bluetooth devices, which can cause connectivity issues. Try turning off other Bluetooth devices or moving your AirTag away from them to see if that helps. Finally, make sure that your iPhone or iPad and the Find My app are up to date, as software updates can sometimes fix issues with connectivity. If none of these solutions work, contact Apple Support for further assistance.

DOUJINDESU:The Unofficial Guide

Doujindesu

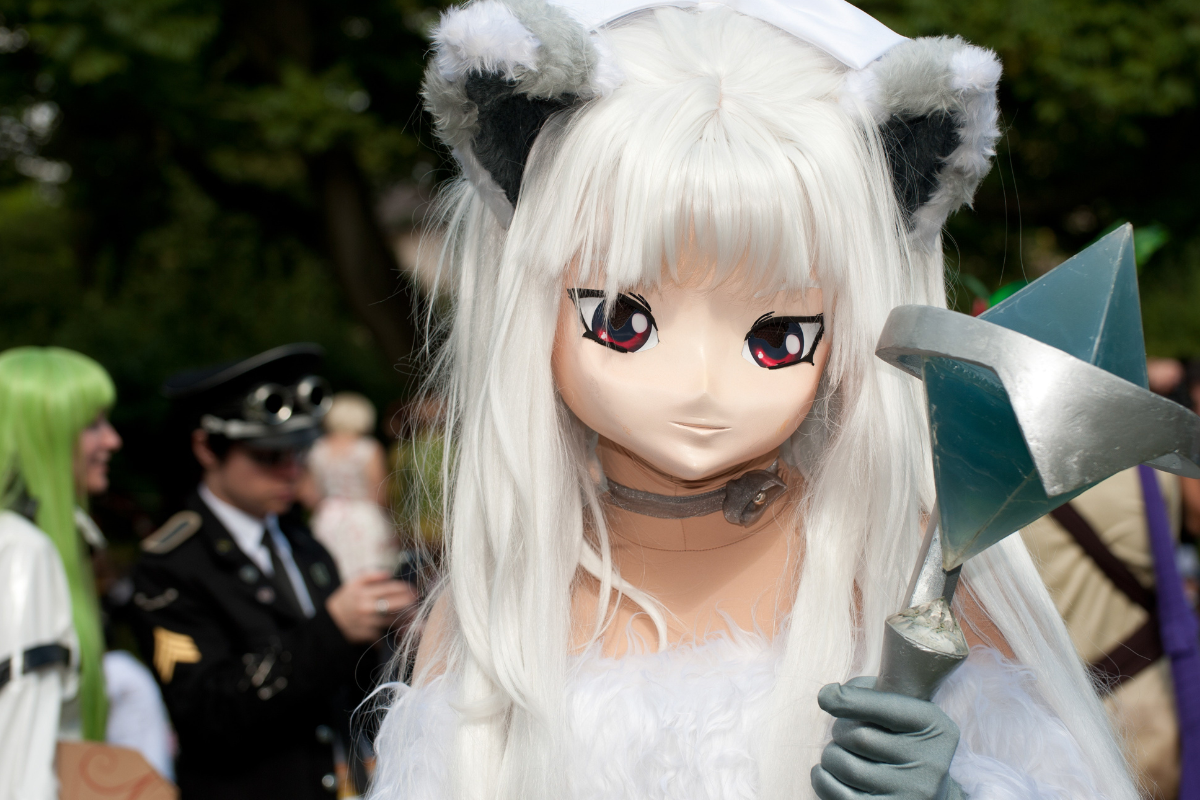
Doujindesu

Doujindesu: The Most Fun You Can Have With Your Clothes On

Hey everyone! SJ here, and I’m here to tell you about the latest trend that’s sweeping the nation: doujindesu! It’s an exciting new way to express yourself through fashion, and I’m here to tell you all about it. What is Doujindesu?Doujindesu is a Japanese term that literally translates to ‘costume play’. It’s a type of cosplay, where people dress up as characters from manga, anime, and video games. It’s a way to express yourself and your love for these characters in a fun and creative way.

How to Get Started With Doujindesu

The first step to getting started with doujindesu is to pick a character you want to dress up as. This can be a character from a manga, anime, or video game that you really enjoy. Once you’ve picked your character, you’ll need to find the right clothing and accessories to bring them to life. You can find these items online or in specialty stores.Once you have all the items you need, it’s time to start putting your costume together. This can be a fun and creative process, as you get to pick and choose the pieces that best represent your character. You can also add your own personal touches to make the costume truly unique.

Where to Wear Your Doujindesu Costume

Once you have your doujindesu costume ready, you can wear it anywhere you want! You can wear it to conventions, parties, or even just to hang out with your friends. It’s a great way to show off your creative side and have fun at the same time.

Tips and Tricks for Doujindesu

Here are some tips and tricks to help you get the most out of your doujindesu experience:-Be creative! Don’t be afraid to try something new or add your own personal touches to your costume.-Take your time. It’s important to make sure your costume looks as good as possible, so don’t rush it.-Have fun! Doujindesu is all about having fun and expressing yourself, so don’t take it too seriously.

Conclusion

Doujindesu is a great way to express yourself through fashion and have a lot of fun at the same time. It’s a great way to show off your creative side and have a blast with your friends. So what are you waiting for? Get out there and start doujindesu-ing!

~ The end ~

Desktop Version | Switch To Mobile Version